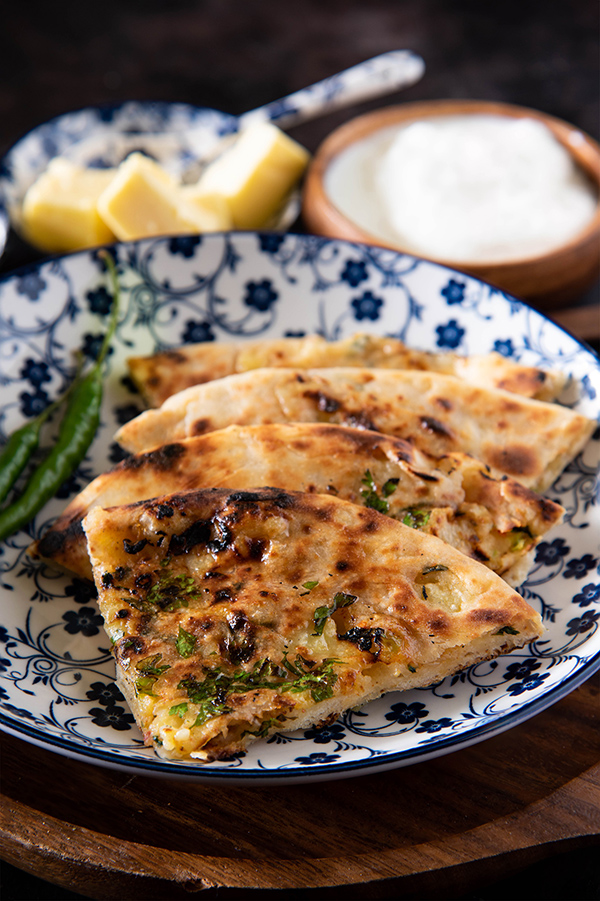
Amritsari kulcha Recipe- An authentic Punjabi meal of Amritsari kulcha and Amritsari chole is a heavenly delight on the plate and palate. The delicious tandoori stuffed Amritsari Aloo kulcha is perfect to serve with Pindi chana masala or Amritsari Dal. In fact, I can eat these spicy potato stuffed kulcha as it is 🙂
Amritsari stuffed Kulcha recipe is the perfect Indian bread recipe from Punjab. It is a perfect Indian bread recipe for breakfast, lunch or dinner. Also known as Amritsari Naan I can easily have this Kulcha solely with just tangy green chutney. But, Try it once with Amritsari Dal it tastes like a heaven.
Amritsari Kulcha Recipe Video
Punjab is known for some delicious North Indian foods and Amritsari Kulcha is sure one of them. Amritsari Kulcha naan is also quite popular in Delhi.
I can tell you there are very few famous Kulcha in Paschim Vihar and Pitampura in Delhi. But with hygiene and health consideration in our day to day food I like to cook most of these delicacies at home.
To start making Amritsari Kulcha recipe, you need very few basic ingredients. This crispy kulcha has spicy potato filling stuffed inside a crispy brown bread.
Normally Amritsari kulcha is baked in a tandoor or clay oven. But most of us living in urban areas do not access to the tandoor. So I am showing you a method of making Kulcha without Tandoor. You can make Kulcha or Naan on Tawa/iron griddle.
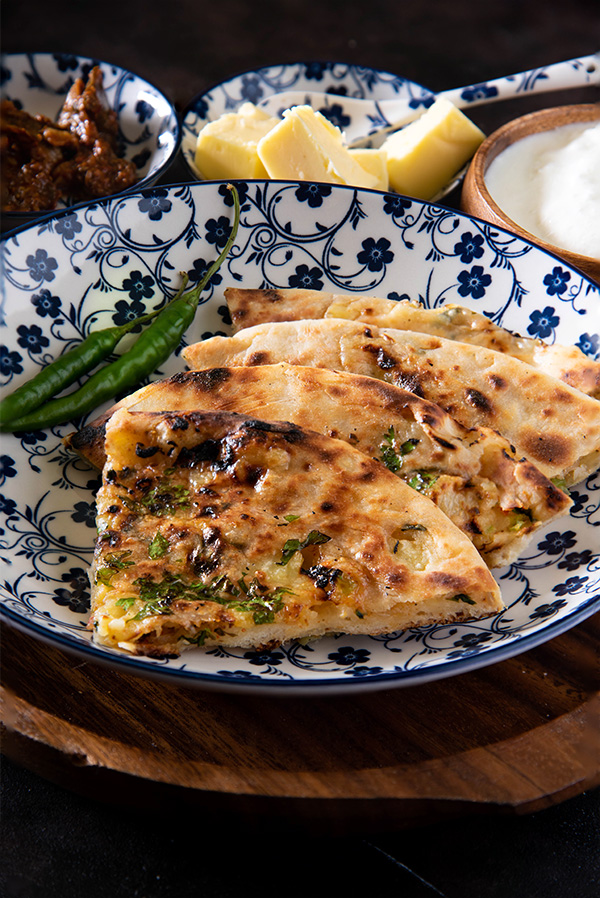
In Amritsar, they serve this Aloo Kulcha, with Chole. You can make the best Amritsari Chole Recipe to go with the Amritsari kulcha. The best part about Kulchas is that they remain soft even if they become cold. They don’t turn hard like Naan’s do and can easily be made in advance and bake them later.
After a lot of trials and error finally, I have settled for this Kulcha recipe. I have experimented with many few ingredients while making the dough for the Amritsari Kulcha. I always make dough for kulcha with warm skimmed milk. It keeps the dough soft and fluffy.
Being a Punjabi I love making authentic Punjabi food at my home, be it Amritsari Kulcha or stuffed parathas. People tend to ask me how I make such fluffy stuffed parathas and I tell them my secret behind making healthy stuffed parathas. You can read more on Is Paratha a healthy Breakfast?
These soft Authentic homemade kulcha recipe can be made with ease and is fuss-free. Just take the recipe notes and follow the easy steps to make this fluffy and fulfilling amritsari kulcha.
How to make Amritsari Kulcha: Recipe Notes
- Use warm milk while breading the dough for the amritsari kulcha.
- Cover the dough (after kneading it) with a clean moist cloth for 45 minutes.
- Use your hands to flatten the dough. You can spread some ghee in your palms for easy flattening.
- Always add ghee in layers, while making the kulcha. This will make the kulcha fluffy and can be easily cut into shapes (as per your preference).
- Flatten the dough with your hands to make the kulcha, use your hands and apply water on one side of the kulcha. Use that side to stick it on the pan. The water will allow the kulcha to stick in the pan.
- Use normal tawa to roast the amritsari kulcha. Since the amritsari kulcha is cooked by putting the tawa upside down the flame, it can be easily made in normal tawa. If you are running short of time you can use the oven too.
📖 Recipe
Amritsari Kulcha Recipe - Stuffed Amritsari Naan - Aloo Kulcha
Ingredients
To Make Amritsari Kulcha
- 2 Cups Maida/ white flour
- 1 teaspoon Sugar
- 1 teaspoon Baking Soda
- ¼ teaspoon Salt
- ¼ cup fresh Yogurt
- 2 tablespoon Ghee
- 1 cup Warm Milk
To Make Potato Stuffing
- 1 cup Boiled potatoes
- 1 cup chopped Onion
- Coriander leaves
- Mint Leaves
- 1 teaspoon grated Ginger
- 1 teaspoon Green chillies
- Salt to taste
- 1 teaspoon Red Chilli Powder
- 1 teaspoon Chaat Masala
- 1 teaspoon Crushed Coriander
- ½ teaspoon Ajwain/ Carom Seeds
- ¼ teaspoon roasted Cumin Powder
Instructions
Steps to Make Naan
- Wash your hands clean and then take a plate where you can easily mix maida or white flour. Now, add 2 cups of white flour or maida in it.
- Add 1 teaspoon of sugar, 1 teaspoon baking soda, ¼ teaspoon of salt on the maida.
- After the salt, add ¼ cups of fresh yogurt, 2 tablespoon ghee and stir them using your hands.
- In order to dough the maida add 1 cup of warm milk in the white flour.
- Now, using your hands gently make a dough of the mix. Knead the dough with your hands for at least 10 minutes till the dough is smooth and soft and it is not sticking on your hands anymore.
- After kneading the dough for 9-10 minutes, cover all sides of the dough with clean moist cloth for an hour or 45 mins.
- After covering the dough with a moist cloth for an hour, take out the dough from the moist cloth, knead it slightly to remove any air present in the dough. Place it on a flat wooden desk (to make the naan)
- Knead the dough to make a circle. Now, apply ghee on the opposite sides of the dough and then fold it.
- Repeat the process 3-4 times, the idea is to spread the ghee in layers in the dough. Repeat the process for one more time. Folding the dough will give you flaky layers.
- After that knead the dough and put it on a plate or dash in such a way that you can easily cut the pieces of dough with a knife. (you can take sizes of the dough as per your liking)
- Now, take one piece of the dough in your hand, pinch sides of the dough and make a round ball of it. As shown in recipe video.
- Repeat the same process with all the dough pieces.
- Cover these round dough pieces with a moist cloth for 15 minutes.
Steps to Make the Stuffing for Amritsari Aloo Kulcha
- Take a bowl and add 1 cup boiled and mashed potatoes in it.
- After that add 1 cup chopped onion, coriander leaves, mint leaves and 1 teaspoon grated ginger in it.
- After that add 1 teaspoon chopped green chillies, salt to taste, 1 teaspoon red chilli powder, 1 teaspoon chaat masala and ½ teaspoon roasted cumin powder in the bowl.
- After adding all the ingredients mix them well using a spoon. (You can use your hands too in order to mix the filling properly)
- After the ingredients are mixed properly, keep them aside.
After 15 minutes take the dough balls out and spread maida on the wooden desk and roll the dough and stuff the aloo/ potato filling in it as shown in step by step method.
- After adding the aloo/ potato filling in the dough, flatten it with your hands, use ghee to flatten the dough with your hands.
- After the dough is flattened in shape then spread some coriander leaves and ajwain on one side of the dough.
- lightly press the flattened bread some more so that the coriander leaves and ajwain stick on it.
- Sprinkle some water on one side of the kulcha so that it sticks on the tawa. When it is done carefully place the naan on the hot iron griddle so that the side of kulcha with water placed down.
- Steps to Tawa Cook Amritsari Kulcha
- After 2 minutes, hold the tawa side and put it upside down the flame. The side of the naan needs to be cooked by the flame.
- Carefully cook all the sides of the naan by holding the tawa upside down. Keep the flame on medium.
- Using a spatula, take out the naan when it's cooked.
- You will see the beautiful chur-chur (layers) of the naan. Pour an ample amount of ghee on the naan and serve with green chutney.
Nutrition
If you love the recipes, do share it with your friends and family. Also, like us on Facebook, Twitter, Instagram and Whatsapp. Pin us on Pinterest, we would love to hear from you do leave your comments below. You can also subscribe to Our WhatsApp Recipe broadcast for Free by messaging Subscribe on +91-8368756817

Pragyan
It's amazing how easily all the steps are explained to make this recipe. Great!
Richa
I love this recipe.
Kaajal
I always wanted to make Amritsar Kucha but could not find an easy way to do so.
This is perfect, i will soon make this recipe. 🙂
Rekha Kakkar
I am glad 🙂 Do try.
Tushar Vaidya
I'm confused. In the ingredients you have mentioned 1/4 cup of yogurt but used only 1/4th tsp. And instead of warm milk listed under ingredients you've used warm water. What are we supposed to use and how much?
Rekha Kakkar
Thanks for pointing this out. It was typing mistake, rectified it now. You can see exact measurements and process in the video of Amritsari Kulcha recipe I have put that live now.
http://www.nutrichoice4u.com/
I got this site from my pal who informed me about this web site and now this time I
am browsing this web page and reading very informative content here.
Shyam Sundar
Very nice
Very nice to nuskha bohot aacha hi
Maneesh
Very nice recipe in easy steps.
Piya Shah
It looks delicious. Crazy.